10 Best Floor Installation Methods for Your Home Renovation?
When renovating your home, choosing the right floor installation method is crucial. It can greatly affect the overall appeal and functionality of your space. There are numerous options available, each with unique advantages and challenges. This can often lead to confusion about which method to select.
Homeowners should consider materials, costs, and durability when deciding on floor installation. For example, hardwood flooring adds warmth but can be pricey. On the other hand, laminate offers a budget-friendly alternative with similar aesthetics. Yet, its longevity may not match hardwood's.
Ultimately, the choice should reflect your lifestyle and home's needs. Some methods can be challenging to install correctly, leading to common pitfalls. A wrong decision might come with regrets later. It's essential to research and weigh each option carefully before making a choice.
Best Practices for Preparing Your Space for Floor Installation
Preparing your space for floor installation is crucial for a successful renovation. Start by removing all furniture and other belongings from the area. This will give you a clean slate to work with. Clear the floors of any debris, dust, or old flooring materials. A thorough cleaning helps ensure the new flooring adheres properly.
**Tips:** Check for any damage to the subfloor. Repairing any cracks or uneven areas now can save you time later.
Next, consider the humidity and temperature of the room. Most flooring materials need time to acclimate before installation. This helps prevent issues like warping or gaps. Keep the space at a consistent temperature.
**Tips:** It might be worth investing in a hygrometer to monitor humidity levels. Floors can react badly to high moisture.
Lastly, measure your area carefully. Accurate measurements help ensure you purchase the right amount of flooring. This minimizes waste and potential delays. Remember, mistakes can happen even to the most diligent planners. Double-check your dimensions and materials. Discrepancies can lead to extra expenses. Taking time to prepare properly will pay off.
10 Best Floor Installation Methods for Your Home Renovation
| Method |
Description |
Best For |
Cost Estimate |
Installation Time |
| Nail Down |
A method involving nails to attach planks to a subfloor. |
Wood Floors |
$2 - $5 per sq ft |
1-3 days |
| Glue Down |
Adhesive is used to bond the flooring to the subfloor. |
Tile or Wood Floors |
$3 - $7 per sq ft |
1-2 days |
| Floating |
Planks are joined together but not secured to the subfloor. |
Laminate and Engineered Wood |
$1 - $3 per sq ft |
1 day |
| Click Lock |
Planks snap together without glue or nails. |
Laminate and Vinyl |
$2 - $4 per sq ft |
1 day |
| Sheet Vinyl |
Large sheets of vinyl installed over the subfloor. |
Kitchens and Bathrooms |
$1 - $3 per sq ft |
1 day |
| Tile Installation |
Ceramic or porcelain tiles set in mortar. |
Bathrooms and High-traffic Areas |
$5 - $15 per sq ft |
2-5 days |
| Carpet Installation |
Carpet is stretched and secured over padding. |
Bedrooms and Living Rooms |
$3 - $6 per sq ft |
1 day |
| Pressure-Fit |
Flooring is held in place by pressure without fasteners. |
Quick Projects |
$1 - $3 per sq ft |
1 day |
| Radiant Heating |
Heating elements installed beneath flooring materials. |
Cold Climate Areas |
$6 - $12 per sq ft |
2-4 days |
Comparative Analysis of Flooring Materials: Pros and Cons
When considering flooring materials, it's important to weigh their pros and cons.
Hardwood offers elegance and durability but often requires substantial maintenance.
It can warp in humid areas and may scratch easily.
Laminate, on the other hand, mimics wood at a lower price but lacks longevity.
It’s prone to water damage and does not add value as hardwood does.
Tile is another popular choice. It’s waterproof and great for bathrooms or kitchens.
However, it can feel cold and hard underfoot, making it less comfortable for living areas.
Carpet provides warmth and sound absorption but can trap allergens and require regular cleaning.
It's vital to assess these aspects based on your lifestyle.
Tip: Always consider your climate when choosing materials.
Humid environments may not suit hardwood or carpet.
Consider the installation method too. Some DIY options can save money but may lead to mistakes.
Hiring professionals ensures a high-quality finish but can be costly.
Tip: Measure your space accurately to avoid unnecessary waste and extra costs.
Step-by-Step Guide to Installing Hardwood Floors
Installing hardwood floors can elevate the look of your home. It’s essential to follow a structured approach to ensure quality results. Start by measuring the area accurately. The National Wood Flooring Association recommends adding an extra 5-10% to cover mistakes and waste. This provides a safety margin and helps avoid delays.
Once measurements are done, prepare the subfloor. The subfloor must be clean, dry, and level. Any imperfections can lead to issues later on. If your subfloor isn’t ideal, consider using a self-leveling compound. This investment pays off when stability issues arise.
Tips: Choose the right underlayment. Quality materials can enhance sound insulation and moisture protection. Adjust your installation method based on the wood type. Some hardwoods work best with glue, while others are better suited for nail-down techniques. Always acclimate the wood before installation to prevent warping.
After laying the flooring, don't forget to allow time for expansion. Many overlook this step, causing floorboards to buckle. Pay careful attention to the edges and ensure proper spacing. Hardwood is a durable choice, but following these steps is crucial to achieve the desired look and longevity.
Understanding the Importance of Proper Subfloor Preparation
Proper subfloor preparation is critical in any home renovation project. It directly impacts the longevity and performance of your flooring. According to a report by the National Floorcovering Association, nearly 30% of flooring failures are due to inadequate subfloor preparation. Homeowners often overlook this step, leading to costly repairs down the line.
The subfloor serves as the foundation for your flooring. If it’s uneven or damaged, it can cause buckling, squeaking, or premature wear of the surface layer. A study from the Floor Covering Institute shows that using underlayment can significantly reduce these issues. Properly installed underlayment not only enhances comfort but also increases the lifespan of the flooring material.
However, many homeowners skip necessary steps like moisture testing or leveling the subfloor. These oversights can lead to poor adhesion and reduced insulation. It’s essential to address these issues before laying down new flooring. Taking the time to prepare the subfloor correctly will ensure durability and satisfaction with your home renovation. Making mistakes here can be easily avoided with a little education and diligence.
Comparison of Floor Installation Methods
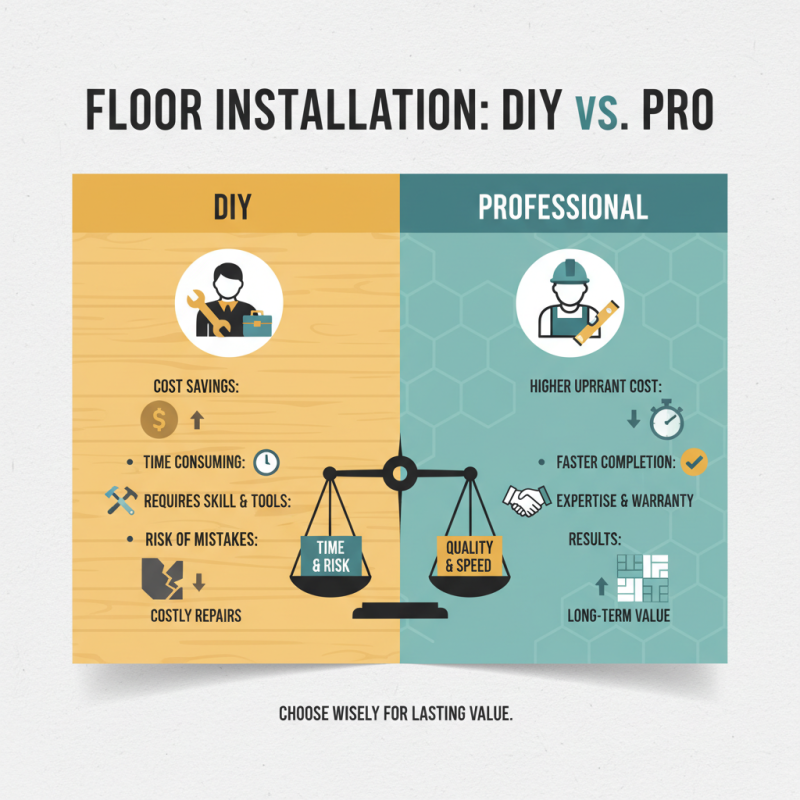
Cost-Benefit Analysis of DIY vs. Hiring Professional Installers
When considering floor installation, the cost-benefit analysis between DIY and hiring professionals is crucial. DIY can save money, but it often demands time and skill. Imagine tackling a complex tile layout without prior experience. Mistakes can lead to costly repairs later on. Sometimes, saving a few dollars today leads to larger expenses down the road.
On the other hand, hiring professionals brings expertise. Skilled installers recognize potential problems before they become significant issues. They understand the subtleties of different materials. However, professional services can strain budgets. It's essential to compare both options carefully. Would you be better off investing in quality installation from the start? Consider hidden costs like tools or potential rework when choosing DIY.
Every project presents its challenges. DIY may empower some, but it can overwhelm others. Conversely, pros offer reassurance but at a price. Weigh these factors based on your renovation goals. Reflect on your abilities and resources. What seems easier now might require more thought later.