
Composite decking can look simple once the boards are installed. The real work begins underneath. A strong frame, accurate measurements, and careful water management determine whether the finished deck stays quiet and level.
For practical guidance, we spoke with deck-building educator Glenn Mathewson. He often emphasizes, “A deck is only as good as the structure beneath it.” That principle shapes this composite deck installation guide. It explains how to inspect the site, prepare the substructure, space the joists, and secure each board correctly. Local building requirements still matter. Check permits, footing rules, railing heights, and manufacturer instructions before cutting materials.
Begin with a clean plan. Mark the deck footprint with stakes and string. Check the ground for standing water after rain. Confirm that joists are straight, supported, and spaced for the chosen boards. Small errors become visible quickly. A single uneven joist can create a raised seam across several planks.
Leave the required gaps for expansion and drainage. Use compatible screws or approved hidden fasteners. Do not force boards tightly together. Composite material still moves with temperature changes. This is where many installations become imperfect. Rushing the layout can waste expensive boards.
The steps ahead focus on real job-site details, from fastening the first board to finishing the stairs and edges. Keep a level nearby. Measure twice. Cut once. A careful installation may take longer, but it usually prevents loose boards, trapped moisture, and avoidable repairs.
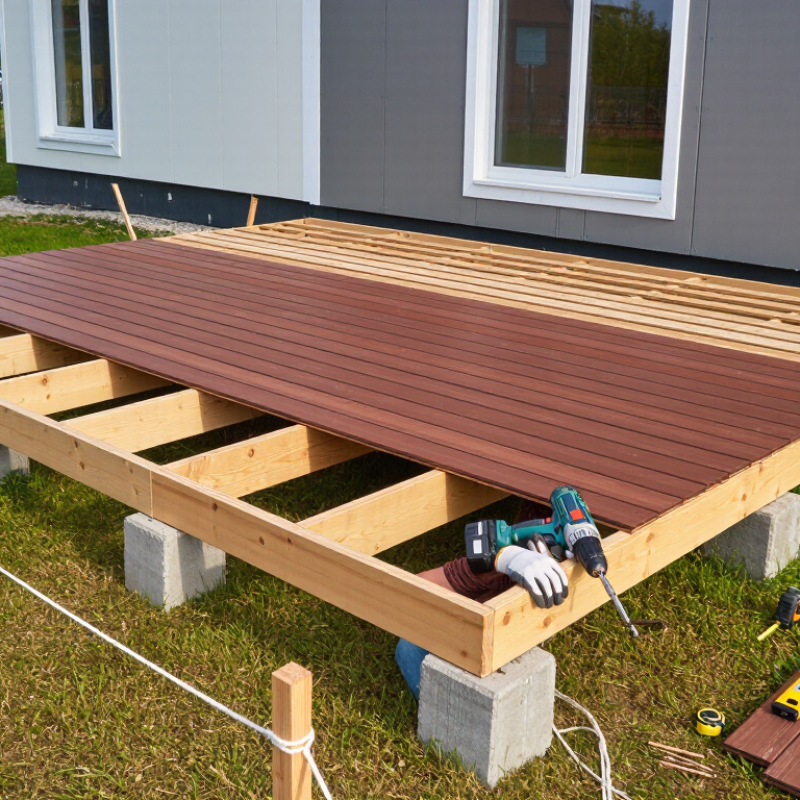
Before planning a composite deck, inspect the site after rain and during dry weather. Note standing water, soft soil, tree roots, and delivery access. Measure the area twice, then compare those measurements with property boundaries and local permit requirements. A level can reveal slopes that look harmless from the doorway. I once underestimated a 40-millimeter fall, so the drainage plan had to change. That mistake was useful.
Sketch the deck from above, marking joist direction, support posts, stairs, doors, and wall clearances. Keep the finished surface below door thresholds, while allowing water to escape beneath the frame. Follow the installation guidance for board spacing and seasonal movement. Dry-lay several boards to test color, direction, and border cuts before fastening. Small errors become expensive. Consider walking paths and furniture placement, not only the rectangle on paper.
Prepare composite boards, treated or corrosion-resistant framing, compatible fasteners, joist tape, post bases, connectors, spacers, and drainage tools. Store boards flat, with support beneath them, in a dry area. Check each package for damage, matching profiles, and required clips. A circular saw, drill, level, square, tape measure, and safety glasses cover most tasks. Gloves help, but careful handling matters more. Recheck the material estimate; early projects often miss spare boards for angled cuts. Purchase a modest allowance because accidental damage is difficult to hide.
Before installing composite decking, inspect the entire substructure, not only the visible joist tops. Check the ledger connection, beams, posts, joists, blocking, flashing, and drainage path. Look for soft wood, split ends, loose bolts, corrosion, and dark staining around fasteners. Use an awl to test suspicious areas. Probe gently.
The American Wood Council’s DCA6 guide designs typical residential decks for 40 pounds per square foot of live load and 10 pounds of dead load. Those figures are useful benchmarks, but local rules may require more. Measure joist spacing in several locations. Sixteen inches on center is common, yet composite boards may require tighter spacing, especially for diagonal layouts. Follow the decking system’s current technical instructions.
The frame should feel rigid underfoot. It should not sway, bounce, or hold standing water. Check the joist tops with a long straightedge; high spots can create uneven boards, while low spots can cause soft-looking dips. The USDA Forest Products Laboratory explains that wood changes dimension as moisture changes, so exposed framing needs adequate ventilation and protection from recurring wetting. I have seen a clean-looking frame fail because water stayed against the ledger. That mistake is easy to miss. Correct rot, improve drainage, replace damaged fasteners, and reinforce weak connections before covering anything. Composite boards are unforgiving. They hide repairs later.
Before installing composite decking, verify that the framing is level, structurally sound, and properly spaced. Common planning limits are 16 inches on center for boards installed perpendicular to joists and 12 inches on center for diagonal layouts or stair treads. Always confirm the final spacing and fastening requirements with the decking installation instructions.
A stable starting row controls every board that follows. Mark the joist centers with chalk, then fasten a straight starter board along the outer rim. Leave the manufacturer’s required expansion gap at walls and posts. Composite boards can move with temperature changes. The 2024 Zonda Cost vs. Value report estimates composite deck projects recover roughly 68% of their cost, so accurate installation protects that investment.
Place spacers over each joist before laying the first field board. Keep the gap consistent, even where the framing looks slightly uneven. A 4.5-millimeter spacer often suits common hidden-fastener systems, but the installation guide must control. Do not force a board into place. I once trusted a crooked rim board and created a visible wave across three rows. It was fixable, but annoying.
Slide hidden fasteners into the side grooves, then drive approved screws vertically into the joists. Keep the drill clutch moderate. Overdriving can crush the groove and reduce holding power. Check board alignment every two or three rows using a long straightedge. Leave larger end gaps in hot weather when required by the board’s movement table. The North American Deck and Railing Association emphasizes proper fastening, ventilation, and drainage in deck safety guidance. Small gaps matter. Poor spacing traps debris and slows drying. Before finishing, inspect every fastener and confirm that no board rocks underfoot.
Lay composite deck boards row by row over a clean, level frame. Before laying the first board, I check every joist with a straightedge. Uneven joists can create soft spots, visible waves, or loose fasteners. A straight deck starts below the surface.
Leave the recommended edge gap beside walls and fixed posts. Measure carefully, because composite boards can expand with heat. I dry-fit the first row before driving any screws. The starter row must stay straight. Use compatible hidden clips or face fasteners, following the installation guide for spacing and placement. Predrill near board ends when required. This reduces splitting and helps protect the surface.
For each new row, set the board against the clips and press it fully into position. Keep the gap consistent with a spacer, not your eye. Small differences become obvious across a wide deck. At butt joints, support each board end on its own joist or approved blocking. Stagger the joints between rows for a stronger, cleaner pattern. Short gaps can close.
Expansion matters. Leave the specified end clearance, especially where boards meet walls or trim. I once cut several boards tightly against a warm wall, assuming the gap looked excessive. They later shifted and needed correction. That mistake changed my process. Now I measure the temperature, check the guide twice, and inspect every row before continuing. When the final board reaches the edge, rip it carefully and allow ventilation beneath the deck.
How to Install Composite Decking Step by Step
Trim the Edges and Complete the Decking Finishes
After securing the main boards, inspect every exposed edge. Look for uneven lines, chipped corners, or gaps that appear too narrow. Measure the deck perimeter again before cutting trim boards. Composite material can expand and contract with temperature changes, so follow the installation guidance for required spacing. Use a sharp, fine-tooth blade and support each board during cutting. A clean cut matters more than speed.
I once rushed an end cut and created a small overhang. It looked minor, but the trim exposed it immediately. I corrected the line with a guide, though the replacement piece was avoidable. Mark the finished edge clearly. Then, cut slowly from the visible side when possible. Smooth rough areas with light sanding, but avoid rounding the profile. Trim boards should sit straight against the framing, with fasteners placed according to the material instructions.
Tips: Check the edge from standing height and from the ground. These angles reveal different flaws. Leave the recommended clearance near walls and posts. Use matching plugs or concealed fasteners where suitable. Do not force a bowed trim board into position. Let it rest, recut if needed, and check the alignment again before fastening. A small gap is often safer than a crowded joint. Finish around stairs and corners with extra care, because these areas receive frequent contact and expose poor cuts quickly.
| Step | Installation Stage | Key Actions | Tools and Materials | Practical Requirements and Checks |
|---|---|---|---|---|
| 1 | Inspect the completed deck surface | Walk across the installed boards and check for loose fasteners, uneven joints, damaged edges, or boards that extend beyond the planned perimeter. | Tape measure, straightedge, pencil, safety glasses | Confirm the surface is level and that the framing remains properly supported. Mark every area that requires trimming or adjustment. |
| 2 | Mark the finished perimeter | Snap a straight line around the outer edge of the deck. Account for the fascia or border-board thickness before marking the final cut line. | Chalk line, measuring tape, square, pencil | Use a square to keep end cuts at 90 degrees unless the design requires an angled edge. Measure from several reference points to avoid a tapered perimeter. |
| 3 | Secure the deck boards before cutting | Check that each board is fixed to the joists and cannot shift during cutting. Install any required hidden or face fasteners before making the perimeter cut. | Drill/driver, approved composite-deck fasteners, clamps | Fasteners should be installed according to the decking system instructions. Do not cut across unsupported board ends. |
| 4 | Trim the overhanging edges | Guide a circular saw along a straightedge or cutting guide and trim the boards to the marked line. Make steady passes without forcing the blade. | Circular saw, fine-tooth carbide blade, straightedge, clamps, hearing and eye protection | Support the off-cut so it does not tear the board surface. Keep hands clear of the blade and follow safe cutting practices. |
| 5 | Finish corners and angled cuts | Cut corner boards and diagonal sections individually when required. Test-fit each piece before fastening it permanently. | Miter saw or circular saw, bevel gauge, square, pencil | Check that adjacent cuts meet cleanly. Avoid sharp splintered points and leave the expansion space specified for the decking system. |
| 6 | Sand and clean the cut edges | Lightly smooth rough saw marks and remove loose particles from the cut edge. Brush or vacuum away dust and shavings. | Fine-grit sanding block, soft brush, vacuum, dust mask | Use light pressure because excessive sanding can change the profile or appearance of the composite surface. |
| 7 | Install fascia or edge boards | Position fascia boards flush with the deck perimeter, pre-drill where required, and fasten them to the rim joist or blocking. | Fascia boards, drill/driver, exterior-rated screws, spacers, level | Use sufficient blocking behind the fascia. Keep the board straight and maintain the clearance required for drainage and ventilation. |
| 8 | Complete stair and border details | Trim stair treads, riser coverings, picture-frame borders, and other edge pieces. Align visible seams and keep the layout consistent. | Tape measure, square, saw, drill/driver, approved fasteners | Verify that stair nosings are secure and that walking surfaces do not create trip hazards. Maintain consistent gaps between adjoining boards. |
| 9 | Check spacing, drainage, and ventilation | Inspect board-to-board gaps, end gaps, side clearances, and the space around posts, walls, and drainage points. | Gap gauge or spacer, tape measure, flashlight | Gaps vary by board design, temperature, and installation system. Follow the product instructions for the correct spacing rather than using one universal dimension. |
| 10 | Perform the final fastening inspection | Drive proud screws flush with the surface where applicable, remove temporary clamps, and replace damaged or missing fasteners. | Drill/driver, bit set, replacement fasteners | Do not overdrive screws, as this can damage the board surface or reduce holding strength. Confirm that no fastener heads or sharp edges remain exposed. |
| 11 | Clean the finished decking | Sweep the deck, collect cut-offs, and wash away ordinary dust and construction debris using clean water and a suitable mild cleaner if needed. | Soft-bristle broom, bucket, clean water, mild deck cleaner | Avoid abrasive tools and harsh cleaning methods that may mark the surface. Remove metal filings promptly to help prevent staining. |
| 12 | Complete the final safety review | Inspect the entire deck, stairs, railing connections, trim, and perimeter for movement, sharp edges, protruding fasteners, and blocked drainage. | Level, flashlight, tape measure, inspection checklist | The finished deck should feel stable under normal foot traffic, have no exposed sharp edges, and allow water to drain freely away from the structure. |
Important: Composite boards differ in profile, fastening method, allowable overhang, and expansion requirements. Always follow the installation and safety instructions supplied with the specific decking system before cutting or fastening.