How to Successfully Install Solar Panels: A Step-by-Step Guide
As the demand for renewable energy sources continues to grow, solar energy has emerged as a leading solution in the fight against climate change. According to the International Energy Agency (IEA), global solar power capacity reached over 900 GW in 2020, with projections suggesting it could expand to 4,500 GW by 2030. This staggering growth underlines the importance of effective solar panel installation, which plays a crucial role in harnessing the sun's energy efficiently.
Proper panel installation not only maximizes efficiency and energy output but also enhances the long-term sustainability of solar systems. Industry reports highlight that inadequately installed panels can result in a significant drop in performance, with some estimates suggesting losses of up to 30% in energy generation. For homeowners and businesses looking to invest in solar technology, understanding the correct installation process is essential to achieve the desired return on investment and to ensure that their systems operate effectively for years to come. This guide aims to provide step-by-step instructions to help both novices and seasoned installers successfully navigate the complexities of solar panel installation.
Understanding Solar Panel Basics and Benefits
Understanding the basics of solar panels is essential for anyone considering their installation. Solar panels convert sunlight into electricity through photovoltaic cells, which generate energy from sunlight. These panels are typically placed on rooftops or in areas with ample sun exposure to maximize efficiency. They work by absorbing solar energy and converting it into direct current (DC), which is then transformed into alternating current (AC) for household use. This clean energy source is not only sustainable but also helps reduce your carbon footprint.
The benefits of installing solar panels extend beyond environmental considerations. Homeowners can significantly reduce their energy bills, as solar panels can generate a substantial portion of their electricity needs. Additionally, many regions offer incentives, tax credits, and rebates, making solar installation more affordable upfront. Beyond the financial savings, solar energy adds value to your home and provides energy independence, protecting you from fluctuating utility prices. By understanding these fundamentals and the advantages of solar technology, homeowners can make informed decisions about investing in renewable energy solutions.
How to Successfully Install Solar Panels: A Step-by-Step Guide - Understanding Solar Panel Basics and Benefits
| Step |
Description |
Estimated Time |
Benefits |
| 1 |
Research and Planning |
1-2 Weeks |
Understanding local regulations and available incentives |
| 2 |
Site Assessment |
1 Day |
Evaluating roof condition, orientation, and shading |
| 3 |
System Design |
1-2 Weeks |
Creating plans for optimal layout and equipment |
| 4 |
Installation |
2-3 Days |
Professional installation ensures safety and efficiency |
| 5 |
Inspection and Approval |
1 Week |
Ensuring the system meets local codes and standards |
| 6 |
Grid Connection |
1 Day |
Connecting system to the grid for energy use |
| 7 |
Monitoring and Maintenance |
Ongoing |
Regular checks ensure optimal performance and longevity |
Assessing Your Property for Solar Panel Installation
Assessing your property for solar panel installation is a crucial first step to ensure the project’s success. Begin by evaluating the amount of sunlight your roof receives throughout the year. According to the National Renewable Energy Laboratory, homes that receive at least 4-5 hours of direct sunlight per day are ideal candidates for solar panel installation. Factors such as shading from trees, adjacent buildings, or other structures can significantly impact solar energy production.
Additionally, consider the orientation and angle of your roof. South-facing roofs typically capture the most sunlight, while east and west-facing roofs can also be effective, though slightly less so. A roof pitch of 30 to 45 degrees is generally optimal, as it allows for maximum solar gain. If your roof is flat, you can install racks or mounts that tilt the panels towards the sun to enhance efficiency.
Tips: Ensure to check your roof's condition before installation, as older roofs may need repairs or replacement to support solar panels effectively. Moreover, local regulations and homeowners' association guidelines might impact installation possibilities, so it is advisable to consult these resources early in the assessment process to avoid potential complications later on.
Choosing the Right Solar Panels and Equipment
When selecting the right solar panels and equipment for your installation, it’s crucial to consider several factors that can impact efficiency and cost effectiveness. According to the National Renewable Energy Laboratory (NREL), the average solar panel efficiency today ranges between 15% and 22%, with high-efficiency panels costing more but offering better long-term savings through greater energy output. This means that while upfront investments may vary, opting for higher efficiency panels can lead to more significant energy savings over time, especially in areas with reduced sunlight.
Additionally, it’s essential to evaluate the type of inverter used in your solar system. The inverter converts the direct current (DC) generated by solar panels into alternating current (AC) usable by your home. Recent industry studies have shown that microinverters, which work individually for each panel, can improve system performance by up to 20% compared to traditional string inverters. This is particularly advantageous in installations where shading may occur or when panels are not aligned uniformly.
Finally, do not overlook the importance of warranties and certifications when selecting solar equipment. A report by the Solar Energy Industries Association (SEIA) indicates that solar panels typically come with warranties ranging from 20 to 25 years. Certifications from recognized organizations also ensure that the equipment meets industry standards for safety and performance, providing confidence in your investment. By thoroughly researching and choosing the right components, you can maximize the benefits of your solar energy system.
Preparing for Installation: Tools and Safety Measures
Preparing for the installation of solar panels requires careful planning and adherence to safety measures to ensure a successful setup. Before beginning, it is essential to gather the necessary tools, which typically include a drill, fence measuring tape, level, socket set, wire strippers, and safety gear such as gloves and goggles. According to a report by the National Renewable Energy Laboratory (NREL), preparing the right tools and equipment can save installers about 30% of the installation time, optimizing both efficiency and safety in the installation process.
In addition to having the right tools, it’s crucial to prioritize safety measures. The Occupational Safety and Health Administration (OSHA) highlights that falls remain the leading cause of work-related injuries in the solar installation industry, accounting for over 40% of cases. Therefore, ensuring that workers use proper fall protection equipment, such as harnesses and anchors, is vital. Furthermore, having a comprehensive understanding of electrical safety protocols is essential to reduce the risk of electrical hazards during installation. Studies show that job sites with strict adherence to safety protocols report a 50% reduction in accidents, underscoring the importance of preparation in safeguarding workers while installing solar systems.
Solar Panel Installation Preparation: Tools and Safety Measures
Step-by-Step Installation Process for Solar Panels
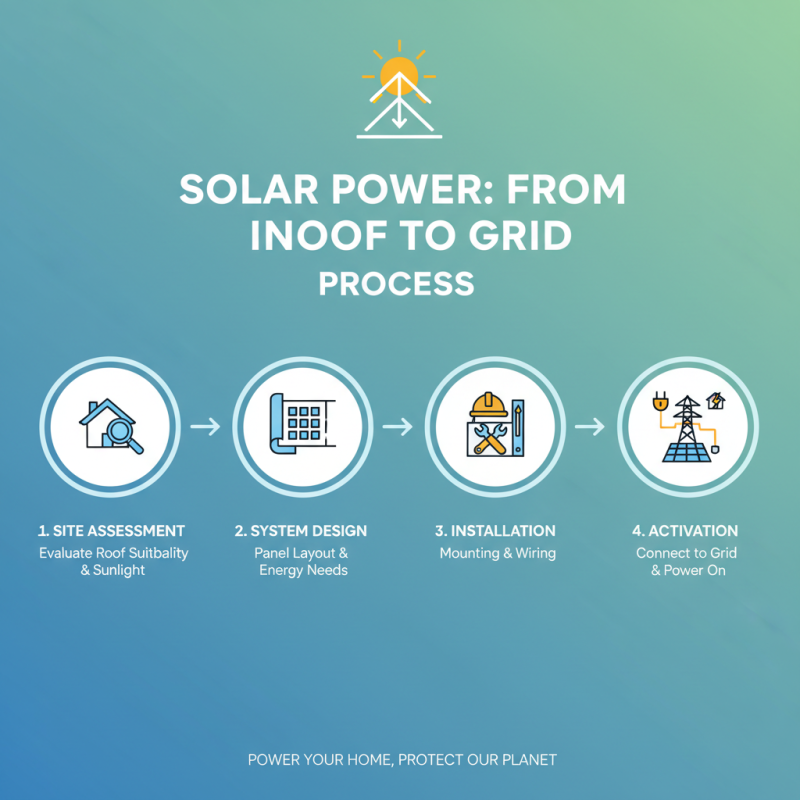
Installing solar panels can be a rewarding project, both financially and environmentally. The step-by-step installation process begins with a thorough site assessment. This involves evaluating your roof's size, orientation, and shading conditions to ensure optimal sunlight exposure. If the site is suitable, the next step is to design the solar panel system, determining how many panels are needed to meet your energy requirements and how they will be arranged.
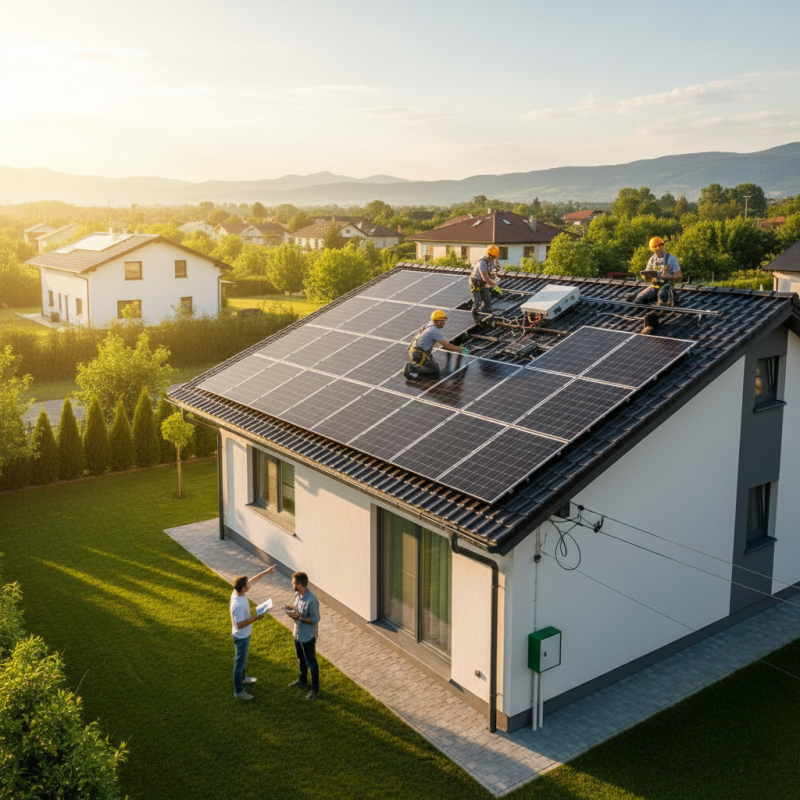
Once the design is complete, you can proceed to the installation phase. This typically starts with mounting the solar panels on the roof or a ground-mounted structure, ensuring they're securely fixed and aligned. Next, you’ll need to install the electrical wiring, connecting the panels to an inverter which converts the generated DC electricity into AC for use in your home. After all components are connected, a final inspection is required before you can turn on the system. Throughout this process, it's crucial to adhere to local regulations and safety standards to ensure a successful and safe installation.